|
|
Post by kintail on Nov 21, 2006 18:25:02 GMT -5
Ken,
I was lucky with the '67 as it spent most it's life in Billings, Montana before it blew a motor in transit just east of here. That kept it in Manitoba till I came across it.
Both inner/outer rockers replaced, rear outriggers and one rear jack point, two holes in floor over same outriggers repaired, battery tray, small piece on exterior of batter tray seam, two rear inner front perforations cut and patched, center heater tube, and small portion of drivers side floor......plus usual dents....Kind of mild compared to your project.
But now with Gerson on the scene and tools available large scale repairs are doable..... although it all takes time.
Looks like John and I need to get together and share in a rotisserie build some day soon...... ;D
Scott
|
|
ken
NUTTIER than a fruitcake
 NUTS Member
Posts: 182
|
Post by ken on Nov 23, 2006 1:44:47 GMT -5
Yeah the rotisserie just makes work soo much easier. If you have multiple projects, which lots of people seem to do, it will come in handy time and time again. These pics are from Day 67 (nov 22). I was hoping to have the metal work done before I leave for Germany next week, but I'm a bit behind. I'm having some issues with the corners, and Gerson is working on a new set for me. The underside is moving right along and I should be ready to out the belly pans back on by the weekend. I'll spend the weekend on the unfinished dogleg and the rear wheel wells, which I had a friend make some panels for locally. This will leave me with just the coners to finish up and a few small details before she goes to the body shop. The roof half stripped 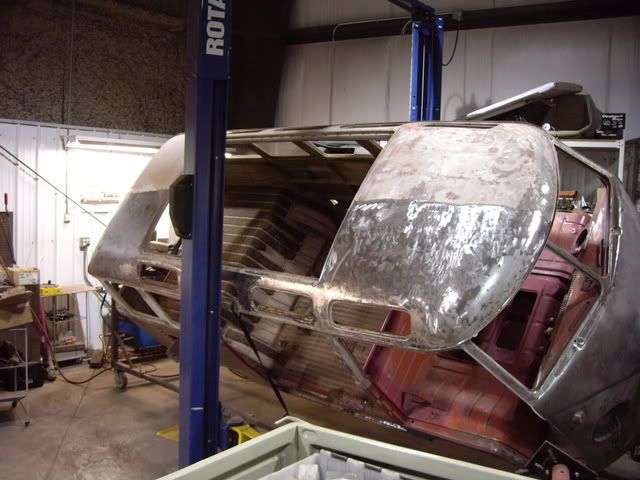 The underside coming along 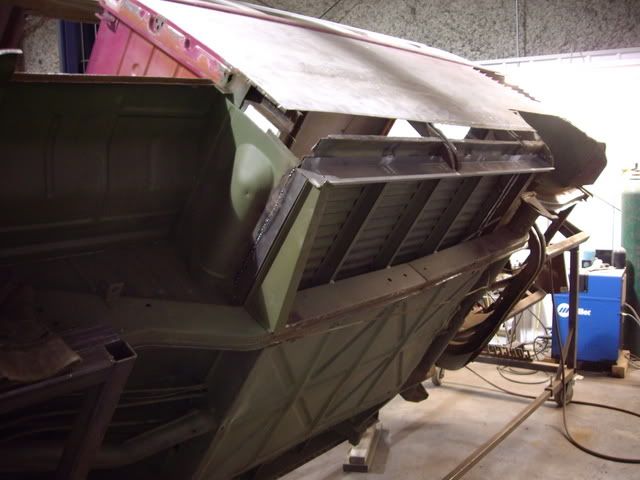 |
|
ken
NUTTIER than a fruitcake
NUTS Member
Posts: 182
|
Post by ken on Nov 27, 2006 1:21:06 GMT -5
Day 71. Today, Sunday, Is one of the better days for getting work done. I have almost a whole day of uninterrupted work. So today I finished off the drivers side, the long rocker, which required a bit of fabricating for the pieces that are behind it. The long rocker is a challenging piece, as you are trying to weld it in, without warping the whole panel. I tried something new and mostly used the TIG welder, instead of the usual mig. Didn't go to badly. Along the bottom edge, I used the spot welder, only doing some at first, and then finishing when I put the belly pan on. There is 3 layers that get pinched together at the bottom, the outer rocker, inner rocker, and the belly pan. I have to install the belly pan on the other side, and a bit more wire-wheeling in some spots to finish up the etch primer down there. Next up will be the wheel wells, then the rear conrners. Getting close to body-shop time...  One of the fabbed panles to match up with the rockers. 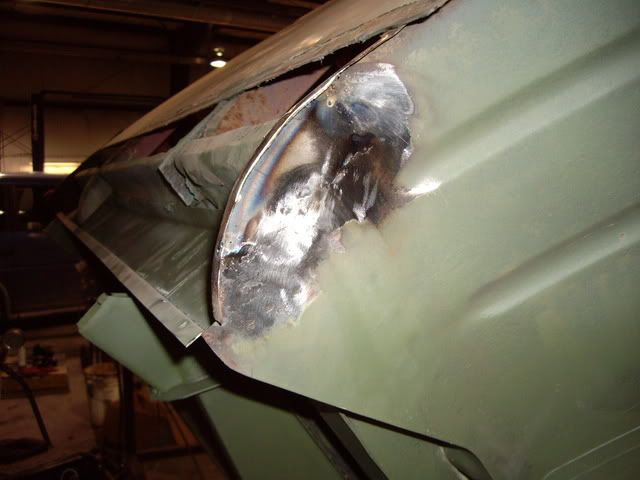 Starting on the rocker 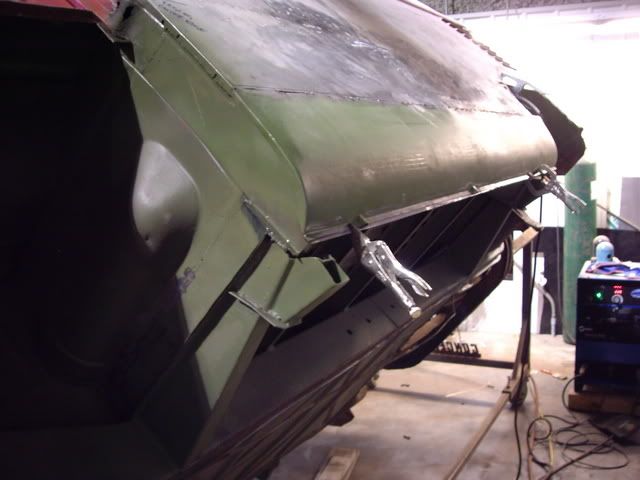 One last look in here 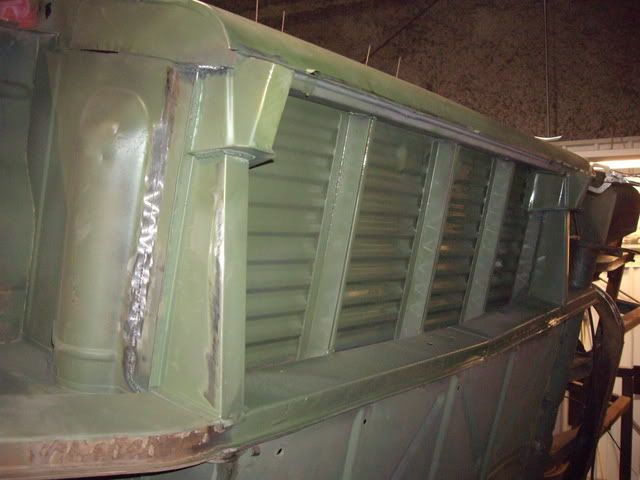 Belly pan...fit perfectly!!! 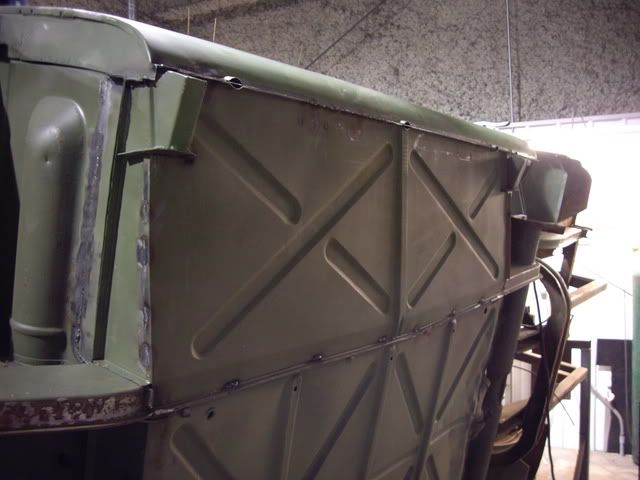 Front edge of belly pan TIG welded, to look like gas welding (original) 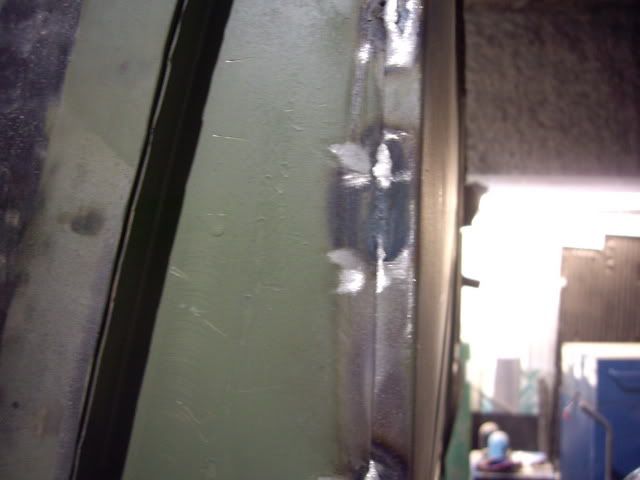 Lower edge of rocker spot welded 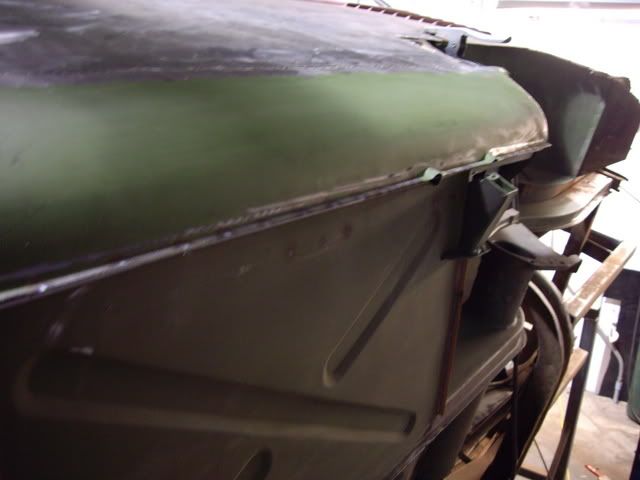 Back edge of belly pan Mig welded. 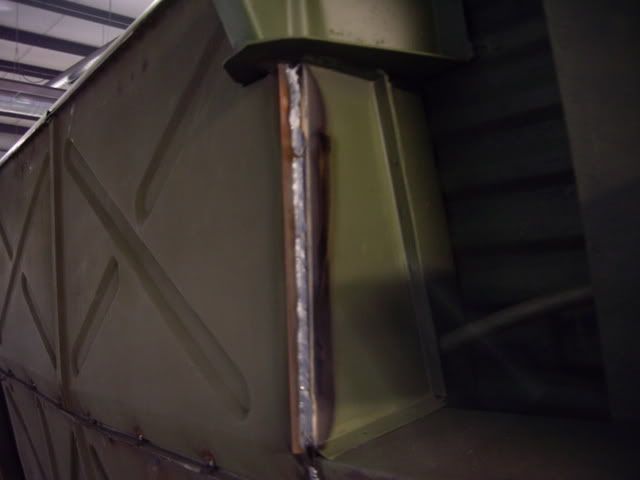 underside, a bit more to go... 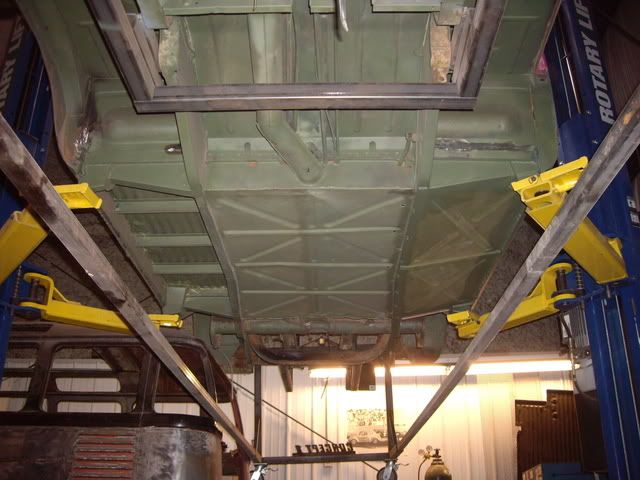 The girls. Rosie, up in the air and Hiedi Below. She is the next project. 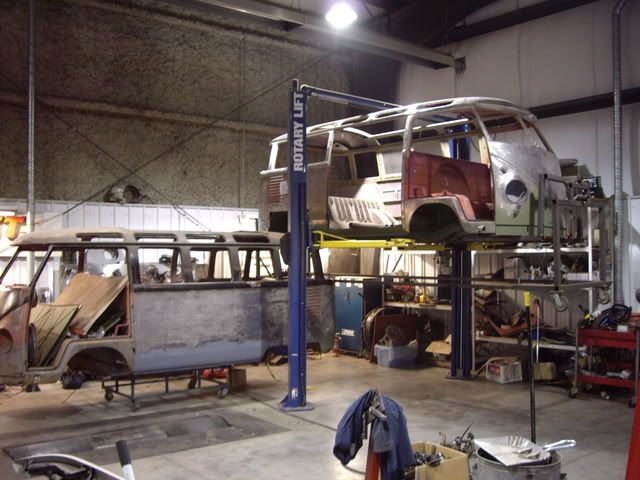 |
|
|
|
Post by commercialair on Nov 27, 2006 8:38:19 GMT -5
It's all looking great Ken! How was the TIG for controlling warpage on the long rocker?? That's a tough panel to do. Are you able to spot weld it without fill rod and then come back to finish it? Also, did you clamp it at the top or just work your way across? Man, it's looking good! The Klassicfab panels really seem to cut down on the time it takes to fit new to old. Chris BTW, finish that damn dogleg already! You're making me feel bad  |
|
ken
NUTTIER than a fruitcake
NUTS Member
Posts: 182
|
Post by ken on Nov 27, 2006 19:24:34 GMT -5
Chris, Don't stress out about the dogleg. It actually made lining up the rocker easier. It's next up on the list, as soon as I get back. The Tig'ing went Ok, you just have to go super slow, and keep a wet rag handy to cool it right away. It's not totally done yet, and in all honesty I might finish up with Mig. I did not clamp it at the top, just a strong magnet; moving it along to the spot I was welding. I can't wait to get this thing out of here, and start on the front end, transaxle and motor. I love that stuff. I'm still not sure what to do for the interior. It will be stock, but I'm just not sure on colors. I guess I have quite a while to worry about that. Gerson's panels go in very smoothly for the most part. Some minor things, but the ones that are the most trouble are the corners. I think this is his first run, and they need a bit of tweaking. Hopefully he will have this sorted out soon.  |
|
BUSNIT
Slightly NUTS
Posts: 30
|
Post by BUSNIT on Jan 2, 2007 19:58:14 GMT -5
WOW KEN  . WANNA JOB?? YOUR BUS IS LOOKING GREAT. I WOULD LOVE TO HELP YOU OUT @ FILLER, PRIMER, PAINT STAGE, BUT YOUR KNOW BY NOW WHAT I'M UP AGAINST. IF YOU GET IT TO PRIMER STAGE, I'D LOVE TO WET SAND, MASK AND SHOOT IT FOR YOU. I'M FORCED TO DO ALL MY METAL WORK @ HOME ON THIS PROJECT....THAT SUCKS!!! BY THE WAY, YOUR SC IS READY. I CALLED CURTIS TO HAVE A FLAT DECK PICK IT UP. MY WIFE(ROSIE) GOT REALLY EXCITED WHEN SHE FOUND OUT THAT YOU NAMED YOUR BUS AFTER HER ;D ARE YOU NOT TELLING ME SOMETHING  |
|
coronabus
NUTTIER than a fruitcake
NUTS Member
What Happens In The Bus...
Posts: 191
|
Post by coronabus on Jan 3, 2007 9:44:06 GMT -5
WHY ARE YOU YELLING? ;D
|
|
ken
NUTTIER than a fruitcake
NUTS Member
Posts: 182
|
Post by ken on Jan 9, 2007 23:31:03 GMT -5
Jan 9, Day 112. Sorry HotVW1... I fell asleep at the wheel.... Had quite a delay in progress due to another overseas trip, and then just the holidays.... Got a bit more done this weekend, finished up that Dogleg that Chris started on. Turned out really well. I just used a section form another bus that I had laying around, and sectioned it in. I also finished up the section at the back of the bulkhead where the floor meets the rocker and the bulkhead, right behind the driver. That was a bit tricky as it is several panels all joining together. The start of the inner dogleg structure 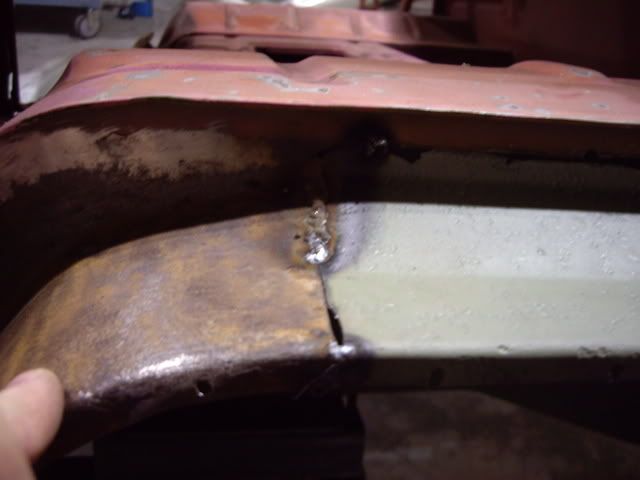 The inner dogleg welded 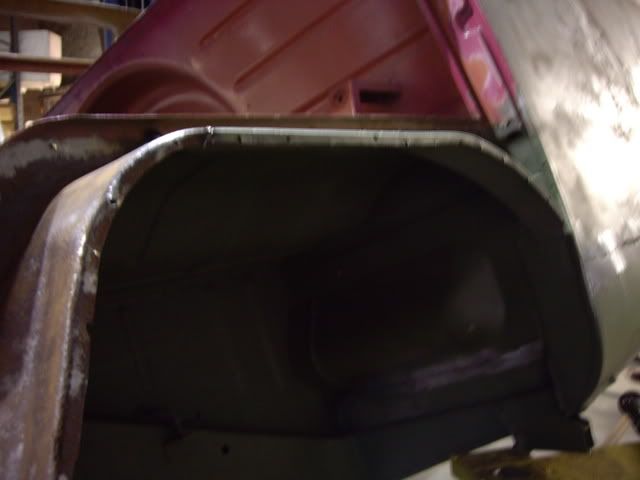 And etch primed 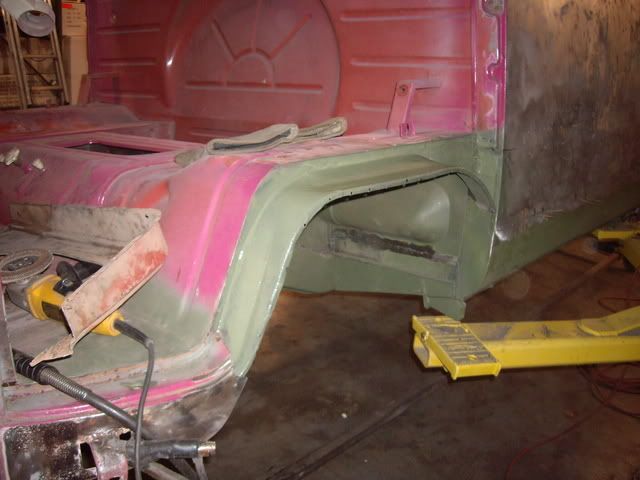 The outer skin starting to go on 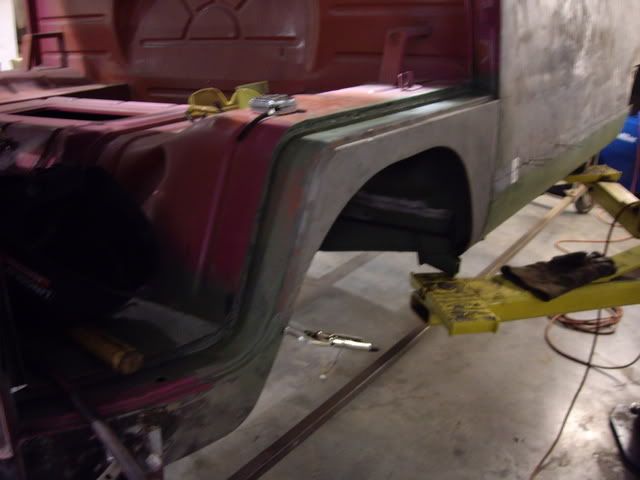 And finished 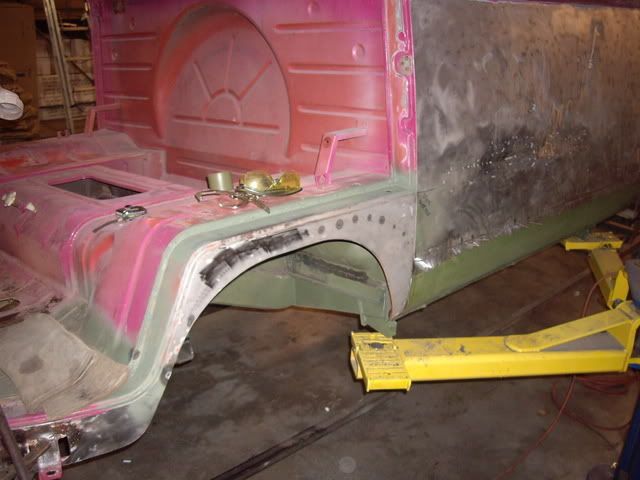 The bulkhead section I was talking about 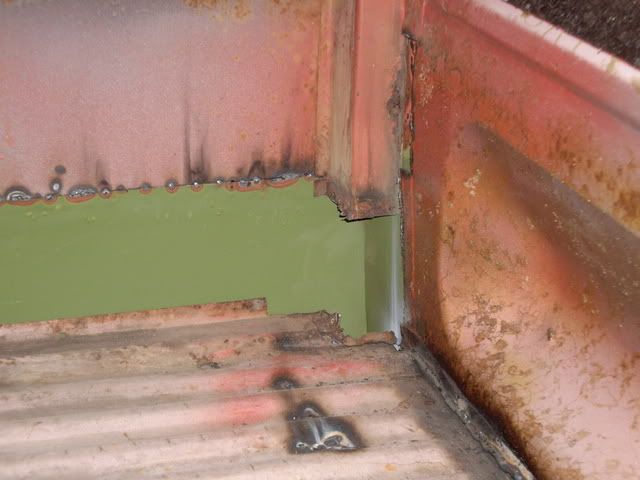 Cleaned up a bit 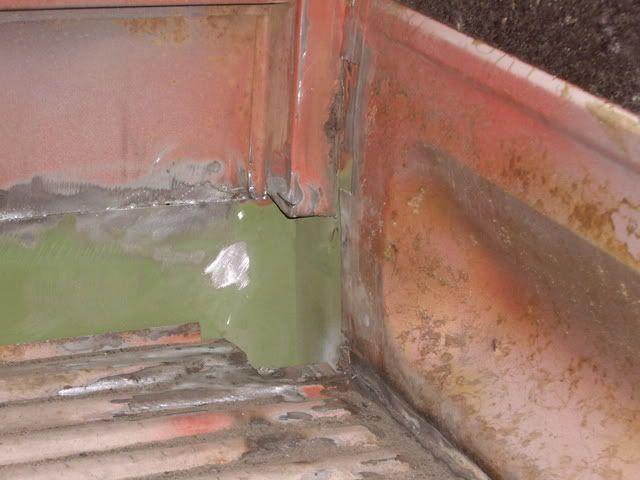 And finished 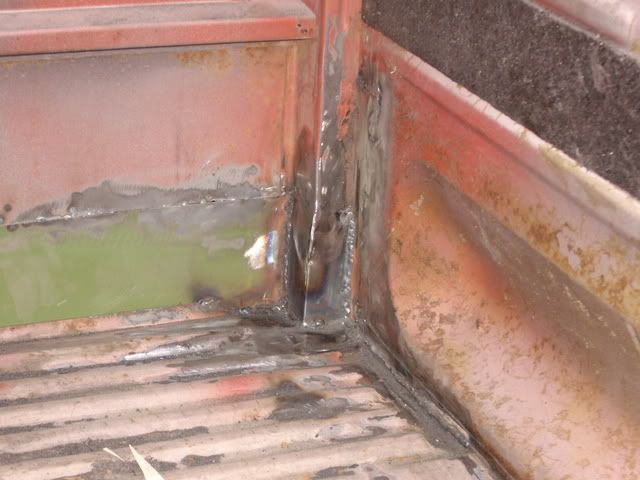 Up next is this corner.... 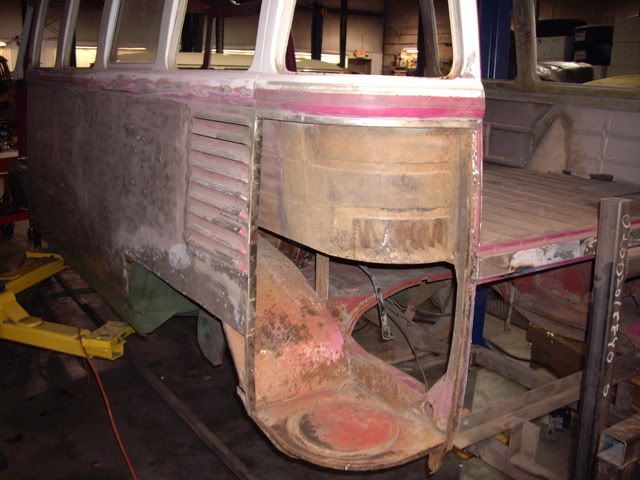 The "list" getting a lot shorter. 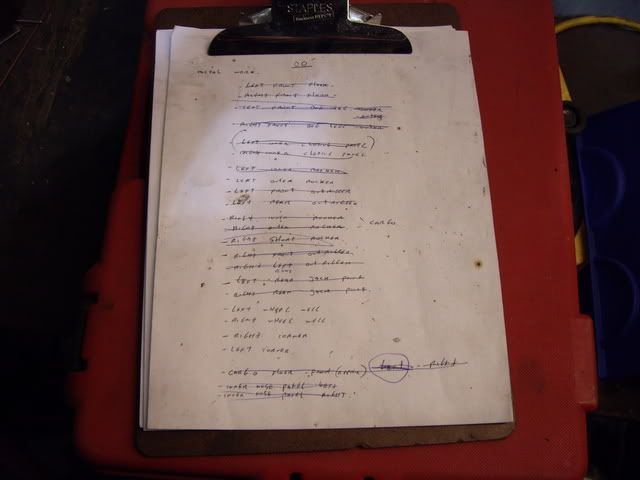 |
|
|
|
Post by dpeters81westy on Jan 10, 2007 0:28:34 GMT -5
Great update Ken...
We're glad to see you back...
- DP
|
|
|
|
Post by davejohansen on Jan 10, 2007 12:05:28 GMT -5
Ken
That rotisairre that you have your 23 window on looks quite handy. Do you have any drawings for someone to build another one or is it patented?
Dave
|
|
ken
NUTTIER than a fruitcake
NUTS Member
Posts: 182
|
Post by ken on Jan 10, 2007 13:50:47 GMT -5
Thanks DP!! I've got to really get after this thing. I'm hoping to have it on the road for this summer.... No patent on the rotisserie... I'll gladly share the knowledge, you best bet is to come and take measurements, and I could give you some suggestions as to how to make a better one. I would change a couple of things if I were to do it again. Keep in mind a rotiserie resto is a big commitment.... you need lots of space, and for as long as it takes to get the job done. Mine has been on there for almost 100 days, and it will likely be 20 more until it can come off. Anyway, you are welcome to come by and have a look anytime. Ken |
|
spice
NUTTIER than a fruitcake
air cooled only
Posts: 109
|
Post by spice on Jan 19, 2007 23:51:32 GMT -5
Hey man where are the updates? I live through you man. I love that last pic with the 2 23's in your shop. I agree with you !! I only dream of restoring a split nice work Ken!! cheers SPICE |
|
|
|
Post by bullyboy on Jan 20, 2007 18:02:48 GMT -5
I thought this was a great way to get at things for not too much money  |
|
ken
NUTTIER than a fruitcake
NUTS Member
Posts: 182
|
Post by ken on Jan 20, 2007 19:35:51 GMT -5
I saw the plans for that style a few years ago. It looks good except for the space required to flip the bus over.... you would need a huge space, or it would have to be outdoors, not super practical for our climate . I spent about $300 in square tubing and $100 in casters. I wish I had used slightly larger casters though, as it would make it easier to move around, or over rougher ground. The other nice thing, is that just by making a set of brakets, you could put almost any vehicle body on the style I made. I've got some more progress pics coming soon.... |
|
ken
NUTTIER than a fruitcake
NUTS Member
Posts: 182
|
Post by ken on Jan 23, 2007 1:33:58 GMT -5
Jan 22, Day 125 This going to be a rather long update, so I might split into two parts. I got a swift kick of motivation and hammered through a bunch of the body work in the last weeks. I also had some help with stripping the paint, which got things moving along. " Why is he showing us a bowl of snowballs?" " Has he lost his mind?" 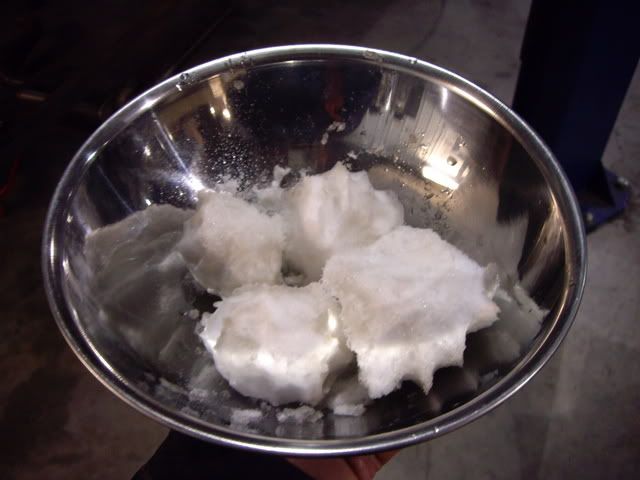 Starting work on the rear corner 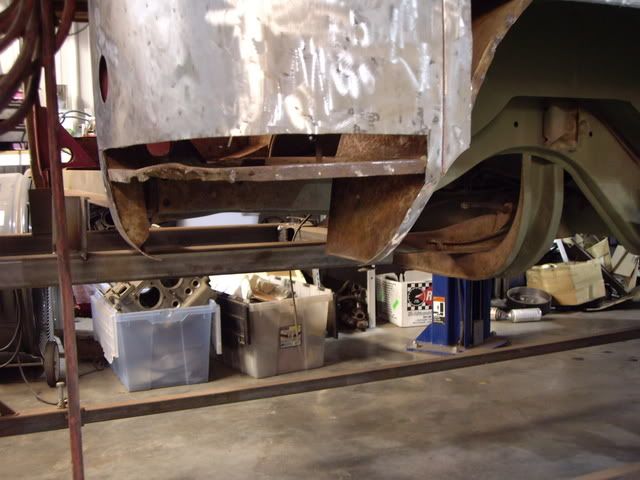 After the Battery tray was fixed, the outer skin was tacked on,  Welded, 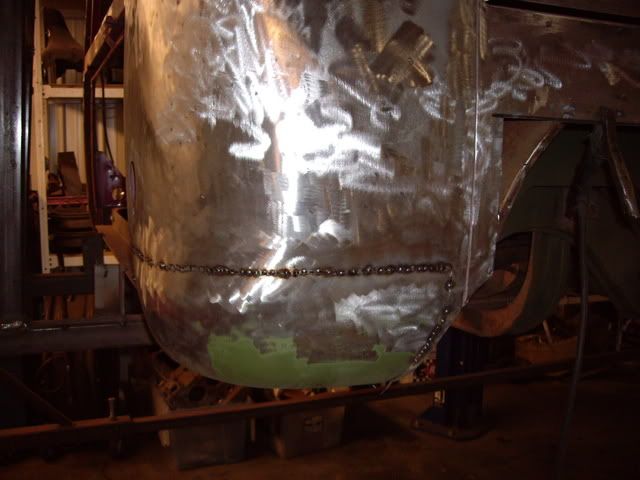 And ground. 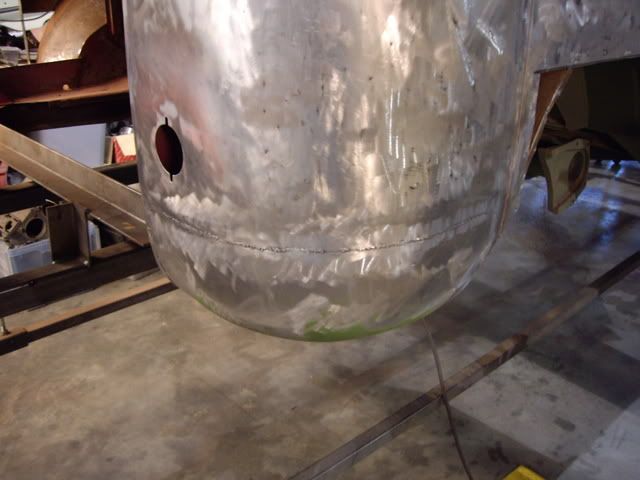 Starting on one of the wheel wells... 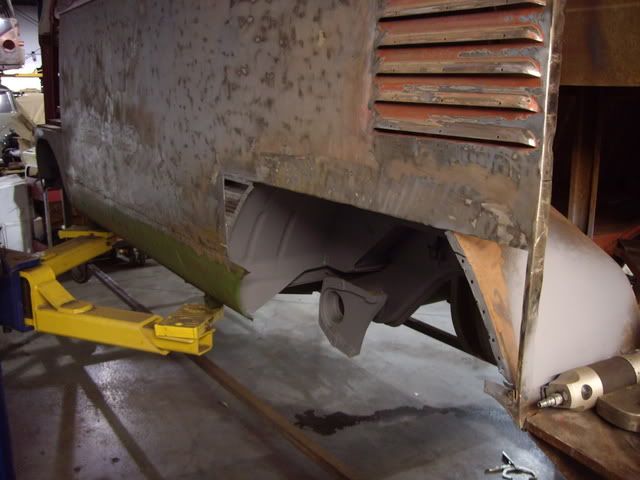 Tacking it on, 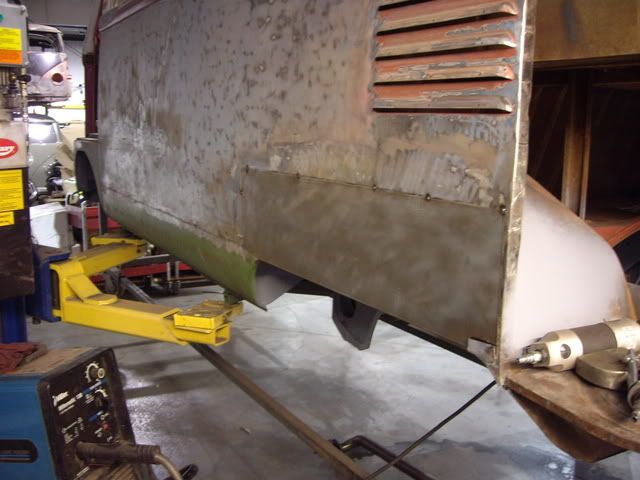 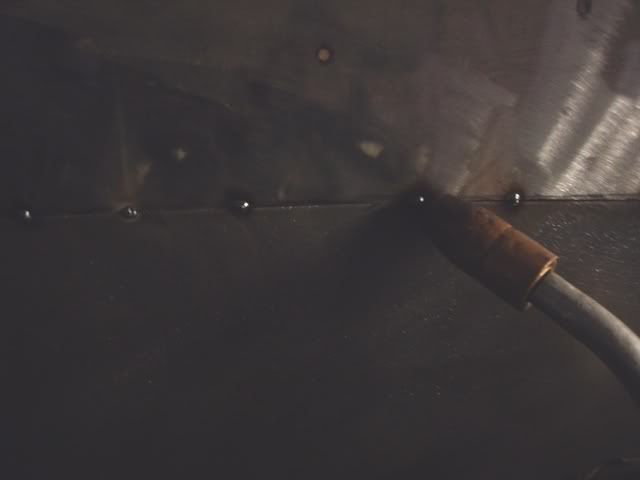 And the snowball secret.... to cool the welds, and get almost no warpage. 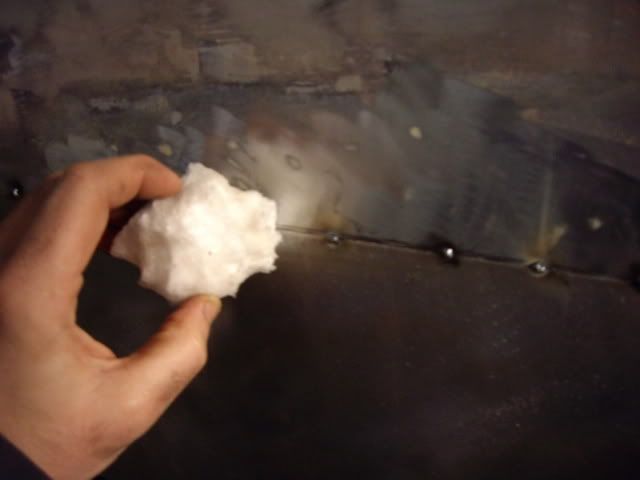 Welded, 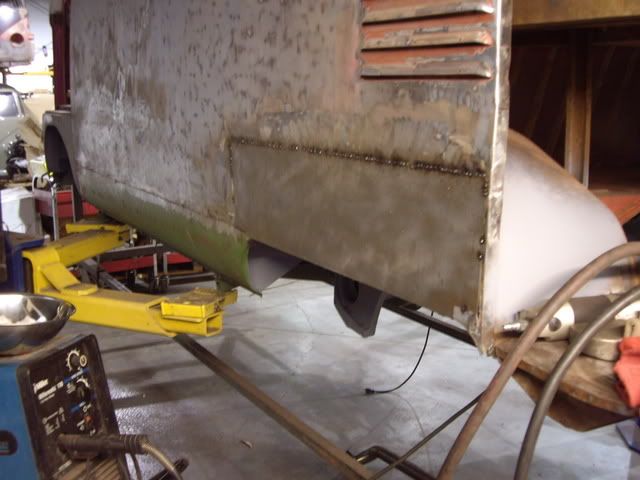 and ground. 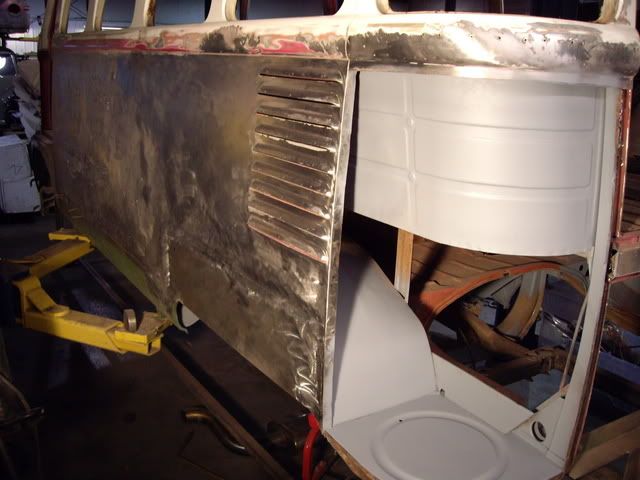 The other side.. 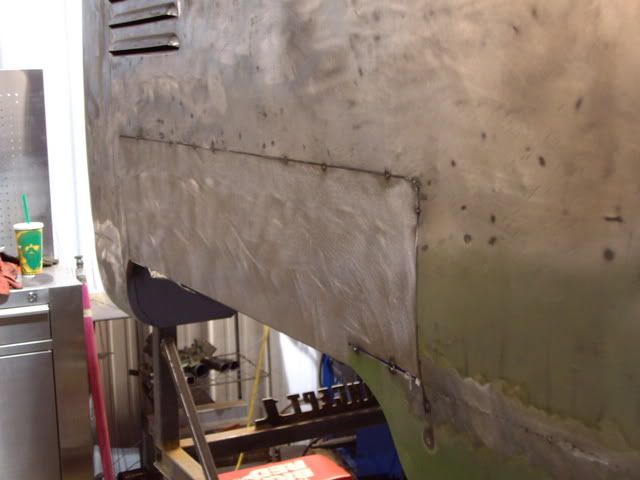 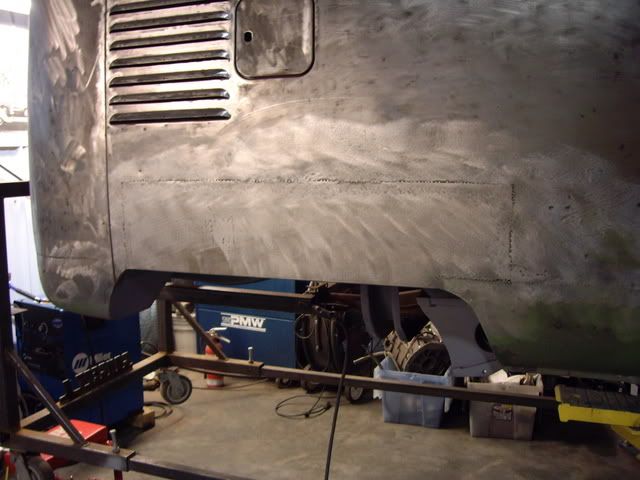 |
|


 . WANNA JOB?? YOUR BUS IS LOOKING GREAT. I WOULD LOVE TO HELP YOU OUT @ FILLER, PRIMER, PAINT STAGE, BUT YOUR KNOW BY NOW WHAT I'M UP AGAINST. IF YOU GET IT TO PRIMER STAGE, I'D LOVE TO WET SAND, MASK AND SHOOT IT FOR YOU. I'M FORCED TO DO ALL MY METAL WORK @ HOME ON THIS PROJECT....THAT SUCKS!!!