|
|
Post by dpeters81westy on Apr 26, 2011 8:03:01 GMT -5
Well, with the weather FINALLY starting to behave like a regular springtime... I've started working on the Bus again. I pulled off the valve-covers, checked the valve clearances and replaced the valve cover gaskets. I'll be making some updates to the fuel lines and re-locating the fuel filter out of the engine bay and beside the gear box. Regular tune-up items will be replaced and then it's onto the brakes. I have new brake hoses on order...and I'll be checking into the condition of the pads when I get the truck down to the shop.
I've also started working on the paint. I put the cup/wire brush on the grinder and have been cleaning up the panels and painting a fresh coat of Tremclad over the works. So far, the Driver's Side inner drop gate is complete and I'll re-paint the outside to match.
One panel at a time... a little bit each day. I'll also be buying a MIG welder in the near future ( 30 days ). Then I can look into some metal replacement and creating a custom set of Tilts and Hoops.
It's going to be a good summer...
Stay Tuned...
- DP
|
|
|
|
Post by dpeters81westy on May 12, 2011 0:26:36 GMT -5
Hello again... I've been working on and off on this project as time and weather allow. Basically, I've been using a wire wheel to attack the surface rust and clean things up a little. I also use the wire wheel to scuff up the 'good' paint a little bit, so that my new rust paint has better grip. Here's an updated photo. The "primer" grey didn't seem to be working out for me, so I went to a "gloss" grey. It's not the color I wanted...but it applied well and did a great job covering up the exposed metal and old paint. 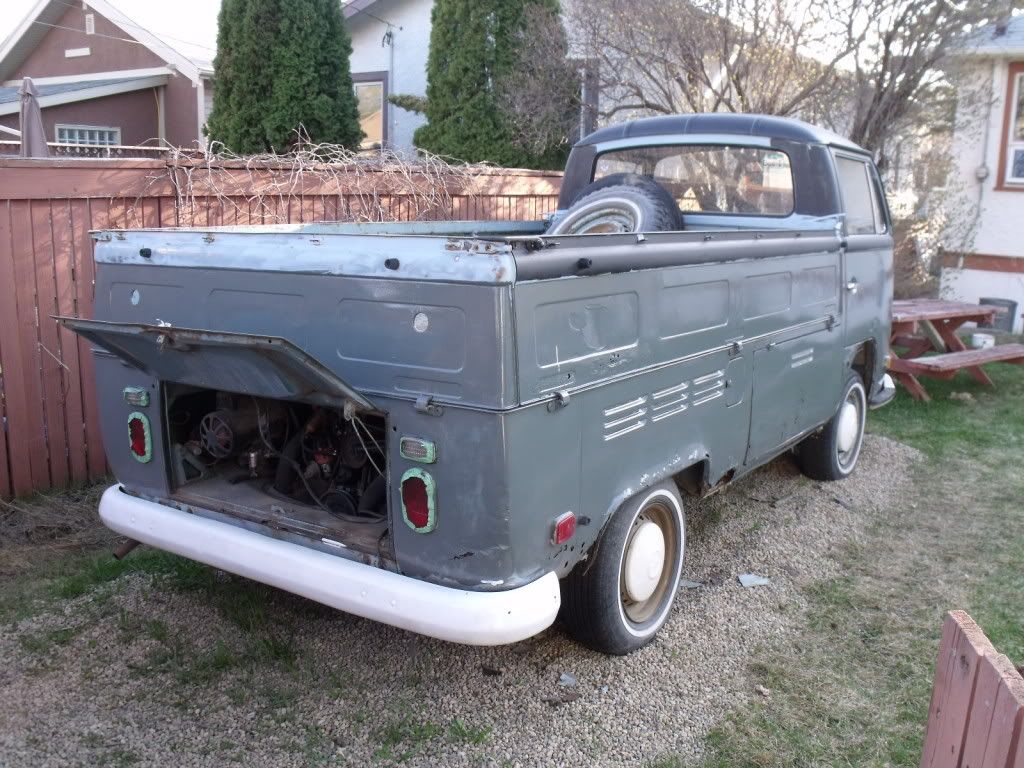 I still have a little bit more finishing to do on the paint...then some replacement metal will arrive...and we'll see where it goes from there. I have replacement brake hoses all around and I'll be doing an oil change and tune-up once I can drive it down to the shop where I work. - Doug |
|
|
|
Post by dpeters81westy on May 24, 2011 0:31:09 GMT -5
Again, not much to report. But, I'll keep updating for you when I have some news. Even small news is some news. So, the body panels have arrived. This particular order included the lower nose section and both rear wheel arch sections. For me, it's exciting to get replacement panels. It means progress and soon I'll be cutting all the rusty,awful mess out and making things much better. I do plan on doing this myself...and I'll be buying a welder next. In the meanwhile, I have new fuel line, fuel filters, and tune up parts ( Cap , rotor, spark plugs etc... ) I did put a battery back into it now that winter is behind me...but, for whatever reason, it won't start. It doesn't even turn over. The truck has power, and the oil light comes on when I turn the key...but no starter solenoid and it doesn't turn over. It "feels" like a dead battery...except it's not. I will be checking the starter and starter bushing to make sure they're in good shape. Then I can get back to driving this again. Also on my "to fix" list is the shifter. I bought all the shifter bushings and couplers. I will also be replacing the shift plate below the shifter itself. So much to do...it'll be exciting though. No more pictures of the paint...but I have most of it completed and it looks pretty good. Here are the photos of the panels. For what it's worth the panels are Klokkerholm panels. Very affordable if I do say so... Left rear wheel-arch 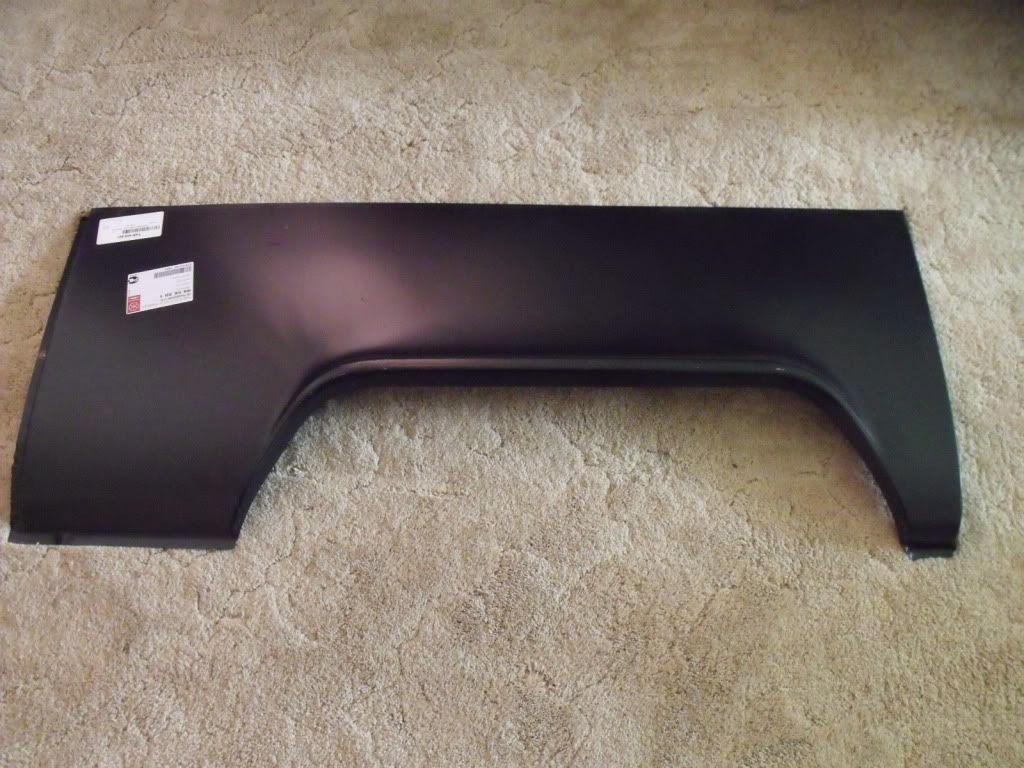 Right rear wheel-arch 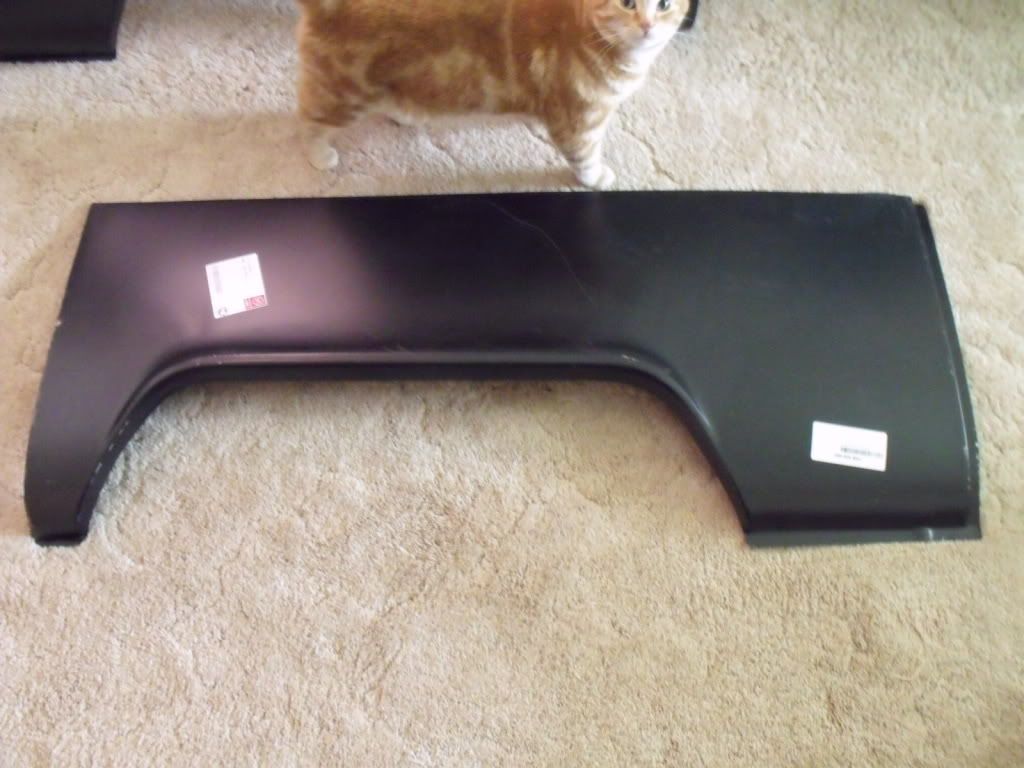 Lower Nose panel 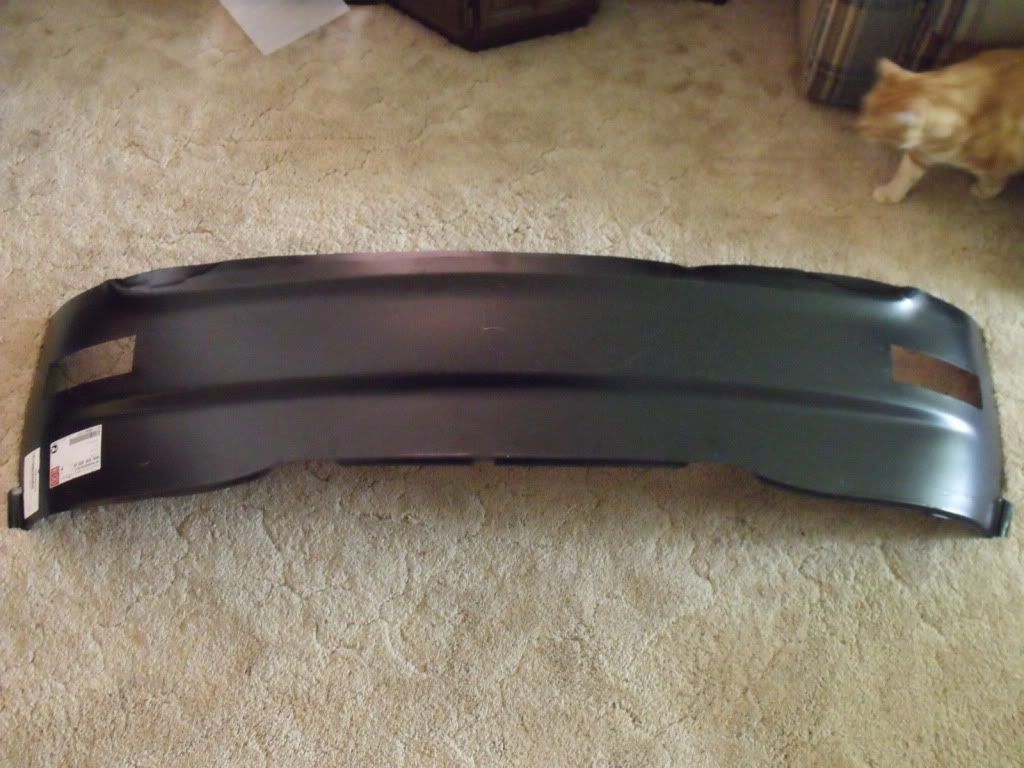 ( and my cat who thought I was snapping photos of him ) - Doug For the curious... you can find all of my photos at www.earlybay.com and search for the username dpeters71single |
|
|
|
Post by dpeters81westy on May 26, 2011 8:13:40 GMT -5
Yesterday I did some work on the Truck. Replaced the fire-hazard fuel filter between the fuel pump and carb with just a piece of fuel line 'without' the filter. I'll be installing the filter beside the transmission out of harm's way.
I also replaced the distributor cap and rotor. I'll get the points and condenser a little later. I also figured out the no-start issue. I guess I hadn't tightened down the negative battery clamp enough...and it wasn't grounding completely. I re-set the clamps last night and it started up no problem.
I took advantage of this to turn the truck around and get it facing the other direction. This will also allow me to focus on the "bad" side of the truck. I've borrowed a Gerson panel from Chris so that i can see about using it to repair the long-panel side (which is basically missing altogether ).
I also found that I'm missing most of one of the cross panels between the frame rails where the shifter, brake cable lines etc... run through. That saddens me a little...but I'll get things fixed and repaired once I get the welder and make some sparks happen.
- DP
I took pics, but they'd scare you all...
|
|
dmuis
Totally NUTS

Posts: 63
|
Post by dmuis on May 26, 2011 9:00:42 GMT -5
Come on Doug! Show us the pics. It will make us feel better about our own projects and motivate us to get moving!  Best with the repairs, Darren |
|
|
|
Post by dpeters81westy on Jun 7, 2011 0:22:22 GMT -5
So, you want the UGLY pics do ya? Well, I'm here to Satisfy your need for rotten sheet metal. THIS is why I got the truck for $500. The BAD Side... 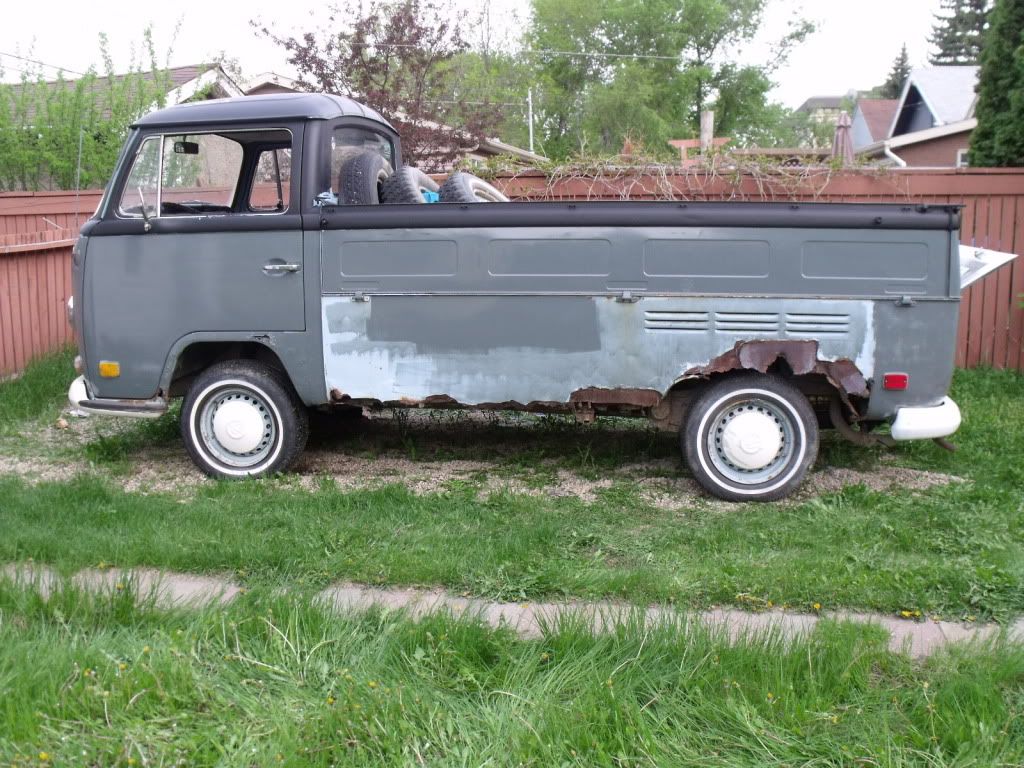 Close-up of Left Rear Fenderwell 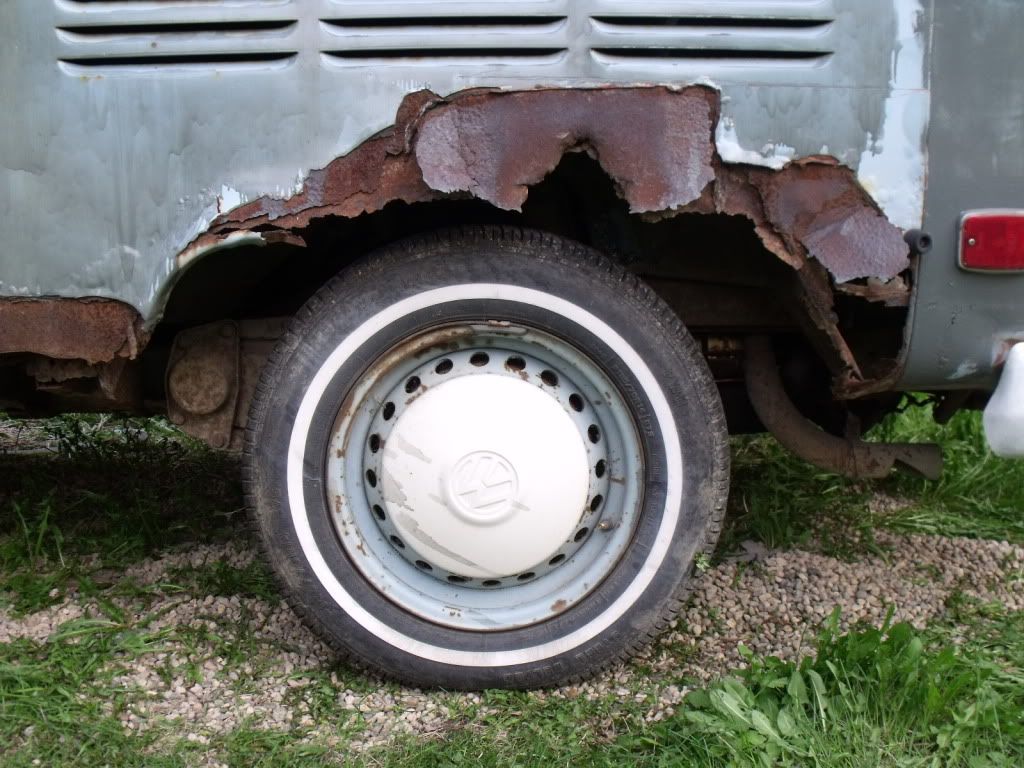 Left side panel...from inside Engine Bay 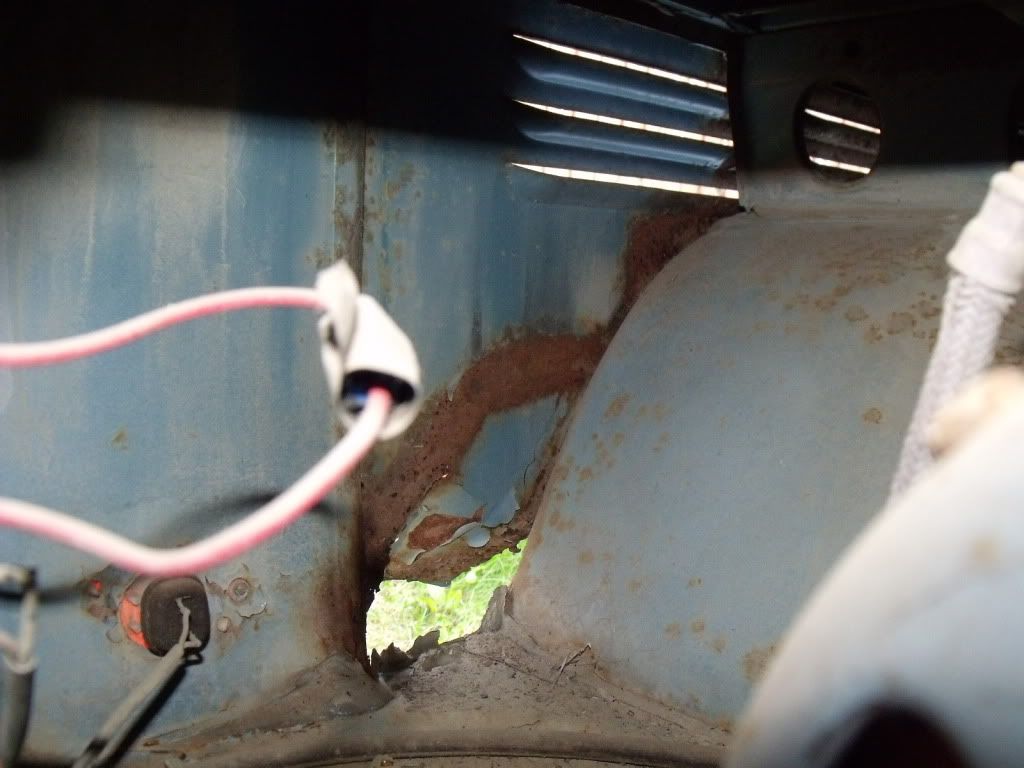 Long Panel Rocker...looking from Left Rear Wheel-well foreward. 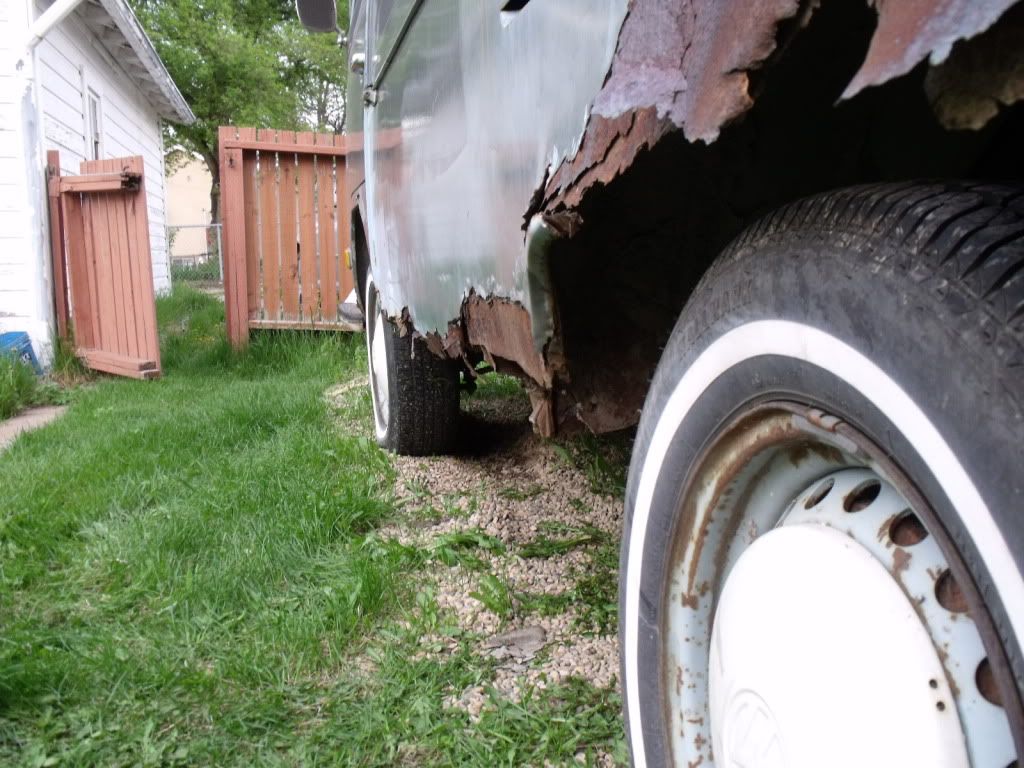 and same panel...from underneath. 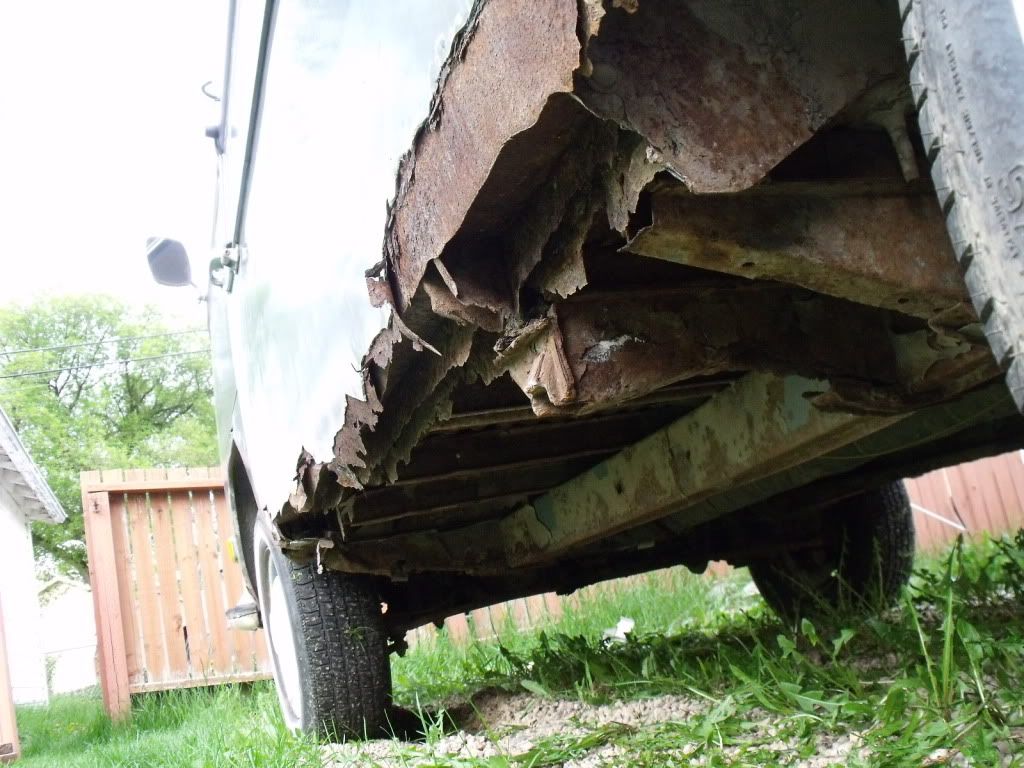 Driver's Rear Wheel-well...they all go rotten at this place 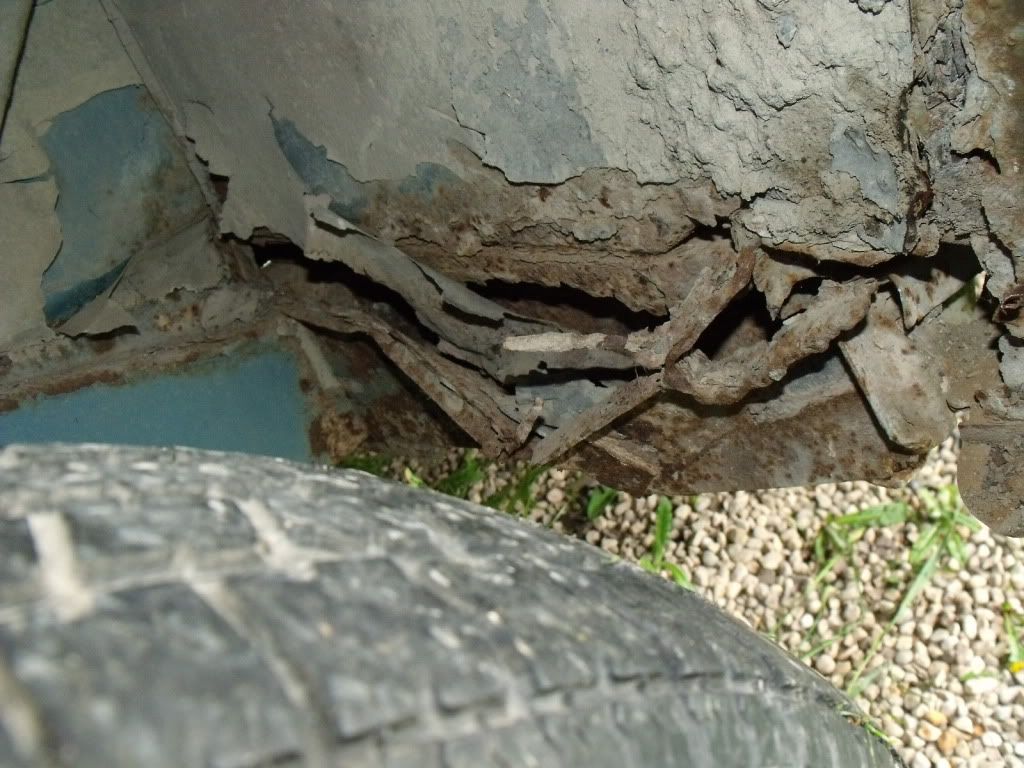 In good news... Lincoln 140 Mig Welders JUST went on sale. I should have mine by Wednesday. Actually, I should also mention that I spent nearly ALL of Saturday driving the SC around. Needed to make a run to the City Dump. So, first out to Grand Coulee to pick up my brother's Christmas Tree and some tie straps... Next to my Dad's place to get rid of some of the garbage that's been piling up. And finally, a run out to the City Dump to get rid of it. I didn't even get to my own garbage due to lack of time... but another day - and another run out to the dump with the SC.  - DP |
|
dmuis
Totally NUTS
Posts: 63
|
Post by dmuis on Jun 7, 2011 1:12:13 GMT -5
Perfect day! Exactly what a singlecab is good for.
Glad to hear you're having fun with it.
|
|
|
|
Post by dpeters81westy on Jun 8, 2011 13:02:41 GMT -5
For the few of you that don't get my Facebook updates... I bought a Lincoln 140 mig-welder last night. I has nearly everything to get me up and welding right away. It can be used as Flux or Mig...but I'm planning to buy a bottle of Gas and not worry about the spatter of Flux welding. When I get things set up, I'll document some of my practicing and such... I'll also be open to opinions on wire speed and temperatures. I'll post photos when I get started... stay tuned... - DP |
|
|
|
Post by dpeters81westy on Jun 12, 2011 15:59:30 GMT -5
Today, I did a couple of things. Firstly, I had another mission to use the truck as a truck. My brother needed a load of Bricks moved to his house in Grand Coulee...and since the truck is the perfect vehicle for this type of work, it was drafted into the task. Here are a couple of photos of the truck at the Building Supplies Depot with the truck ready for action. Sadly, I'm a little new to learning how the camera operates in my smart-phone...so I got a number of photos of the ground when I actually wanted photos of the fork lift loading the bricks onto the truck bed. It was pretty cool...and the truck did a great job with such a heavy load. 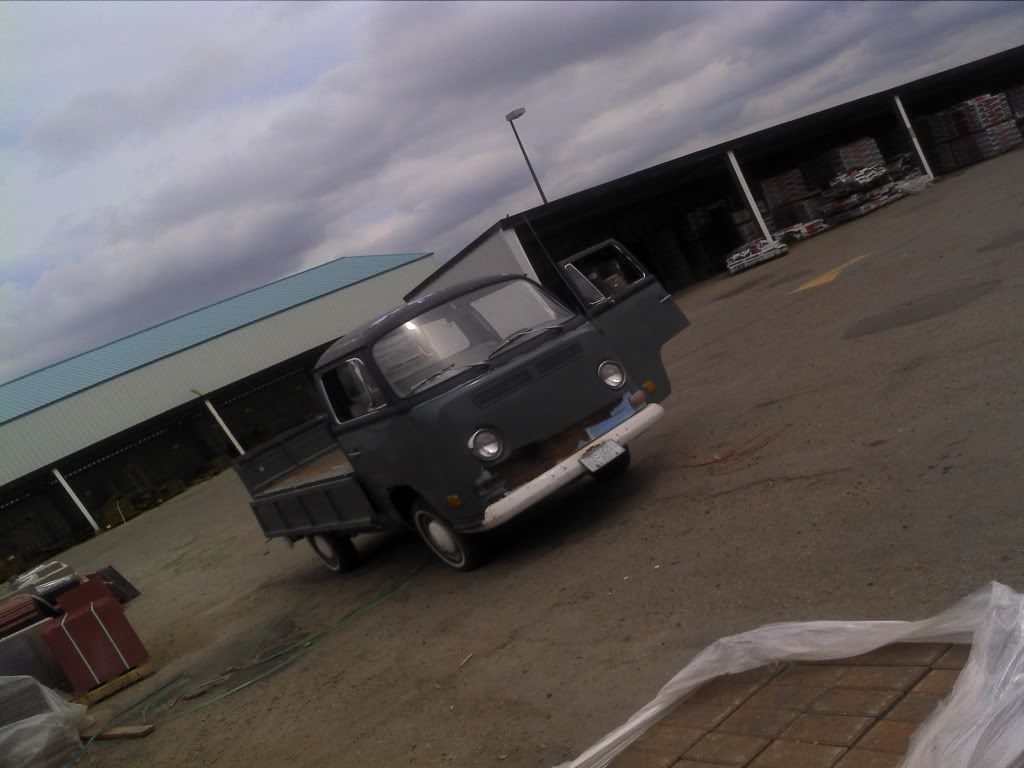 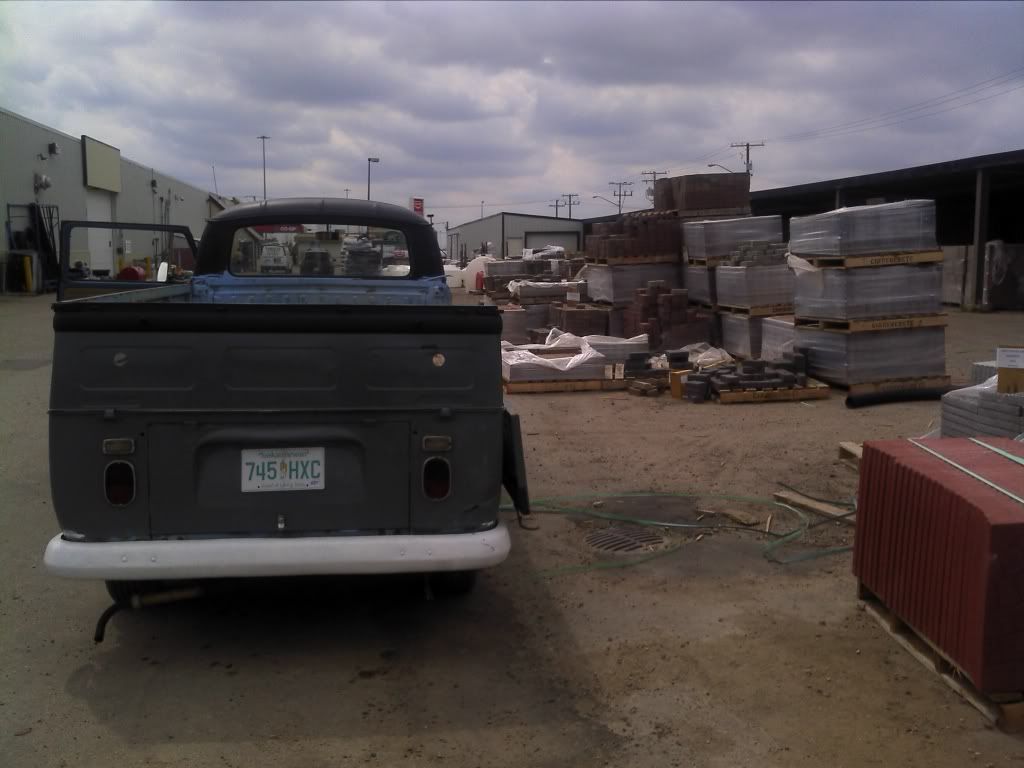 Also, today I discovered that the exhaust needs some work. The long tail-pipe extension common on Type II's started drooping and eventually started to bounce on the gravel as we were driving. Once we stopped and had a look, it appeared that the clamp had given way...and that the pipe itself was ok. With a spare clamp installed, things were much better and there is no more chance of the exhaust rubbing on the ground again. As a side note...I also discovered that the muffler itself has several holes in it at the seams and will require replacement. I also installed a new set of wiper blades...just in case I see any rain while I'm driving. - DP |
|
|
|
Post by dpeters81westy on Jun 22, 2011 8:05:21 GMT -5
I can't remember if I posted this or not...but after buying my MIG welder the other week, I did the proper thing. I read the owner's manual...and watched the CD with video instructions on how to operate this new piece of equipment. After connecting wires, dialing dials, and plugging things in... It wouldn't feel the wire. It would humm/buzz as current flowed through it...but no wire feed. I RE-READ all the documents and re-viewed the videos and I re-checked all my connections on the equipment. It still wouldn't feed. So, saddened... I took the welder back and asked for an exchange unit. Fortunately, the process was easy and headache free...and soon I was off with another new welder. I got this one home, un-packed it...re-connected all the wires and checked connections and settings... ....and Nothing.  I was beside myself. So, I RE-READ the owner's manual. It didn't help. After scratching my head and wondering how I'd gone wrong when the instructions were so simple... I looked closer inside the case of the welder. Apparantly, there is an "optional" spool gun that is used for welding on Aluminum ( probably because the wire is extra large and can't be handled by the standard .025 and .035 wire size equipment on the machine. BUT... There is also a toggle switch - and this switch turns off the "wire feed" because on the Spool Gun...it has it's own feeder. I toggled the switch...and sure enough, my welder's feed unit hummed to life. So, WooHoo!! to having a properly working MIG gun... and  OMG... do I feel dumb that I returned a unit because it was set up for Aluminum welding right out of the box. I will say that NONE of the documentation or video even mentions this switch, or to check it if the unit's Feed Spool isn't turning. So, all I need to do is wait for it to stop raining so I can get outdoors and start zapping shit while I learn how to weld. - DP |
|
|
|
Post by dpeters81westy on Jun 28, 2011 0:01:37 GMT -5
Once again, this truck has been more useful than I had ever imagined. But since Dad's truck was written off this past winter, we've had a lot of projects that have needed a truck...and since mine is the most convenient... Here's my latest photo.... 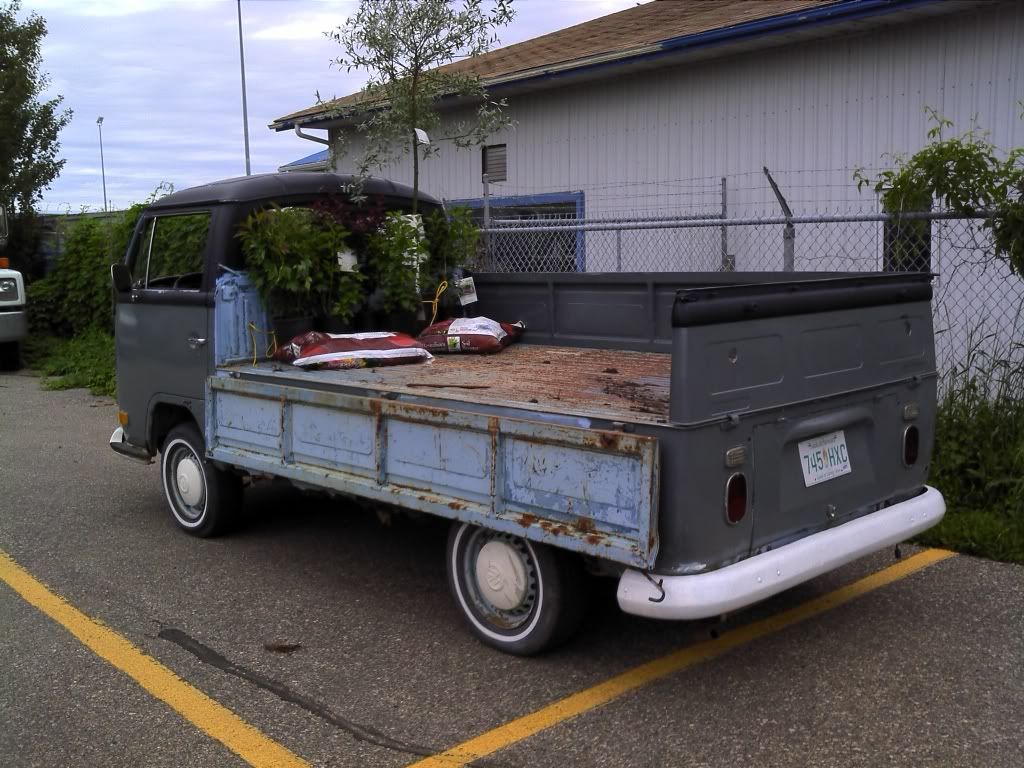 This photo doesn't show all the stuff we loaded onto the deck...but it DOES show that I need to get off my ass and clean and paint the inside of the drop-gate and the headache panel. It doesn't look very nice compared to the rest of the paint. Here, for those of us on Facebook... is a photo of the very-very first panel I've ever welded. I've had no instructions...or assistance. I just grabbed my welder and pointed it at the panel. I also made my first attempts at joining panels together. Yes, I have a long way to go.. but this is what I've done with my first hour of welding practice... now all I need is hundreds of hours more practice. www.facebook.com/media/set/?set=a.10150299857921341.383445.518501340&l=b5c862f44e - Doug |
|
|
|
Post by karmann57 on Jun 28, 2011 18:57:48 GMT -5
Good work DP! The way I look at it, as long as the penetration is good all the ugliness can be cleaned up with the grinder. Hopefully I can get the garage finished up soon so I can start playing the panel replacement game too!
|
|
|
|
Post by dpeters81westy on Jul 14, 2011 22:39:50 GMT -5
Hey everyone, just updating my project again. I realize that things have been slow...but I am starting to make some progress and getting a little bit more brave when it comes to this Bus. As we all know, it's RUSTY...but I've surfed enough forums and watched enough builds to inspire me to tackle the job myself. It's rewarding to develop new skills..and it saves me paying someone else to do it for me. Here's a photo of my '71 SC and the rusted out rear section of the front wheel well. 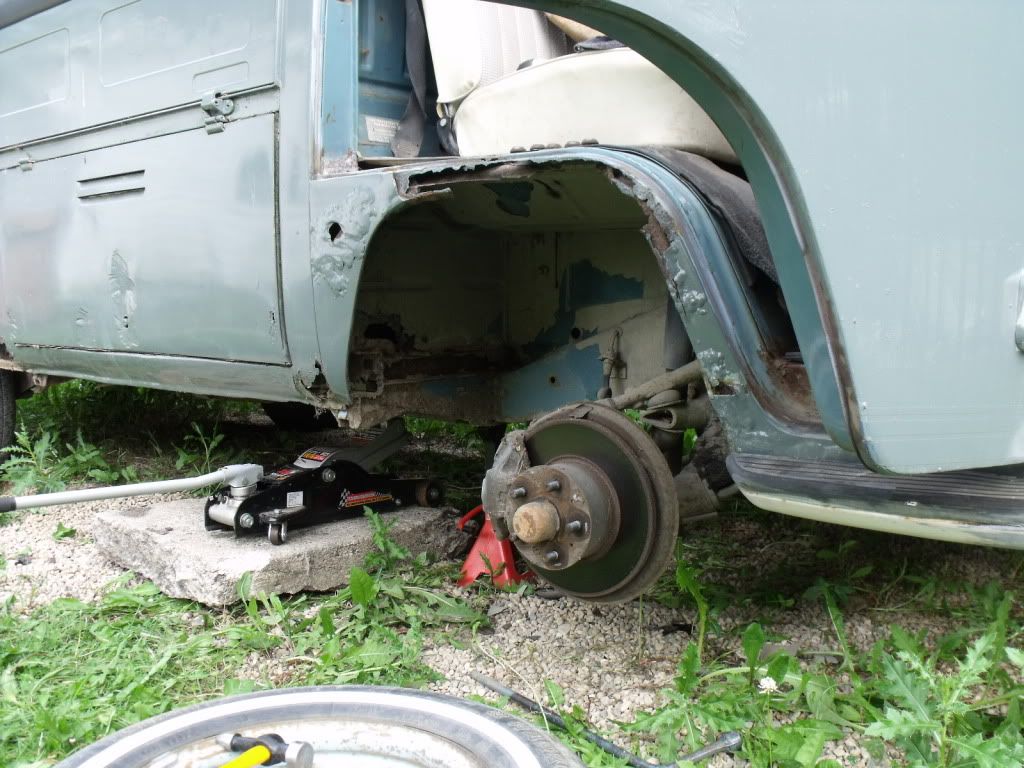 And now a closer look at the challenge ahead of me. 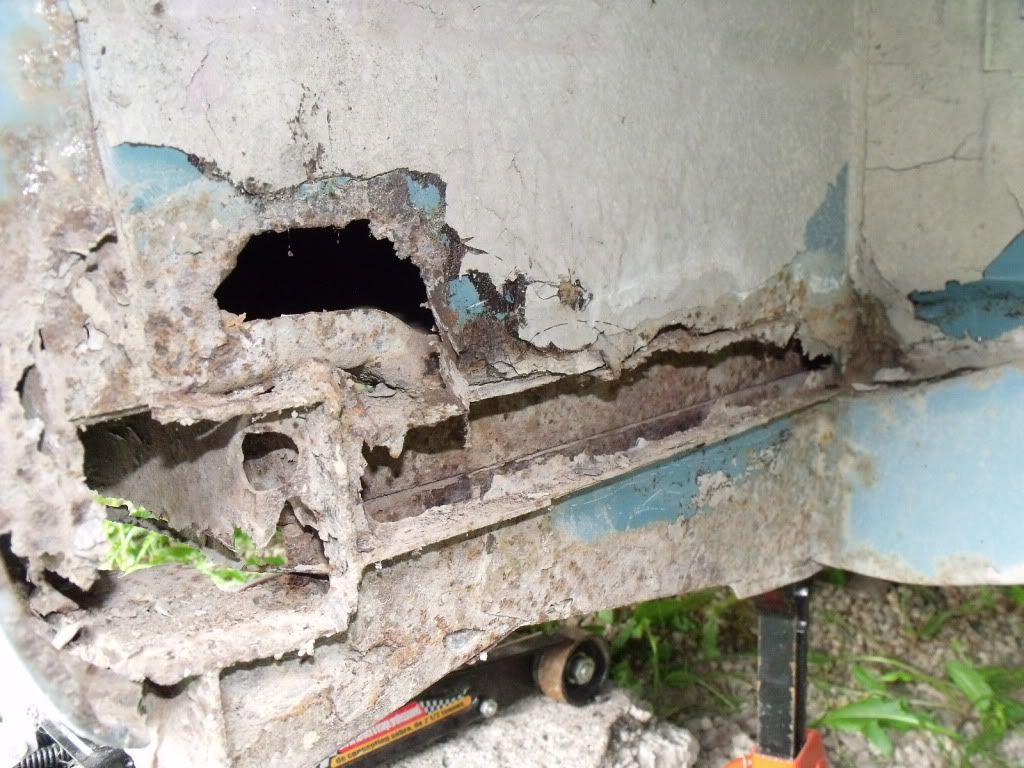 Basically, I decided to cut out the rusted sections and try to save as much original metal as I could along the way. The front Jack-point has some crusty spots...but in general is salvagable. The panel above the jack point where it meets the panel above it needs some work. This coincidentally, seems to be where the loading deck floor meets the panel below the rear-cab panel.  and here it is once I put in a little effort to clean up the surfaces a bit. 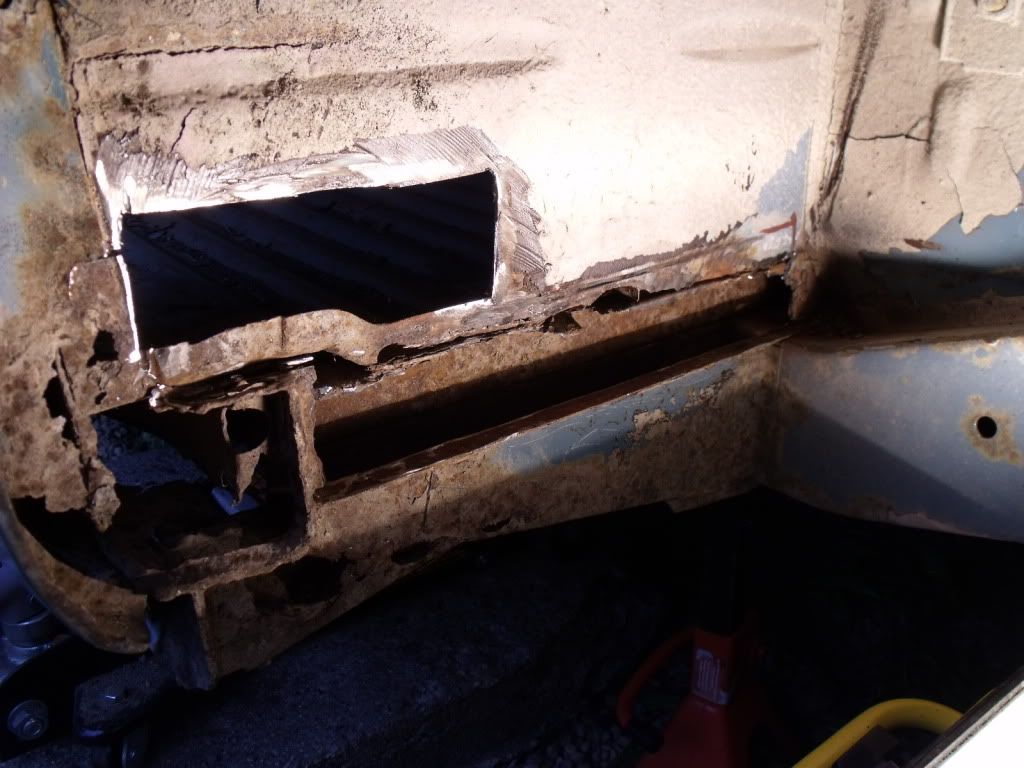 I do have a couple of concerns though. The place where the jack point meets the frame rail is narrow and impossible to get to with my grinder. I've knocked out the rusty metal with a body working hammer ( the pointy one )...but I don't feel that it's clean enough to weld to. Advice on how to get into such a tight space? Here is a photo of the same section that I had cut out...looking from inside the treasure chest forward toward the wheel well. 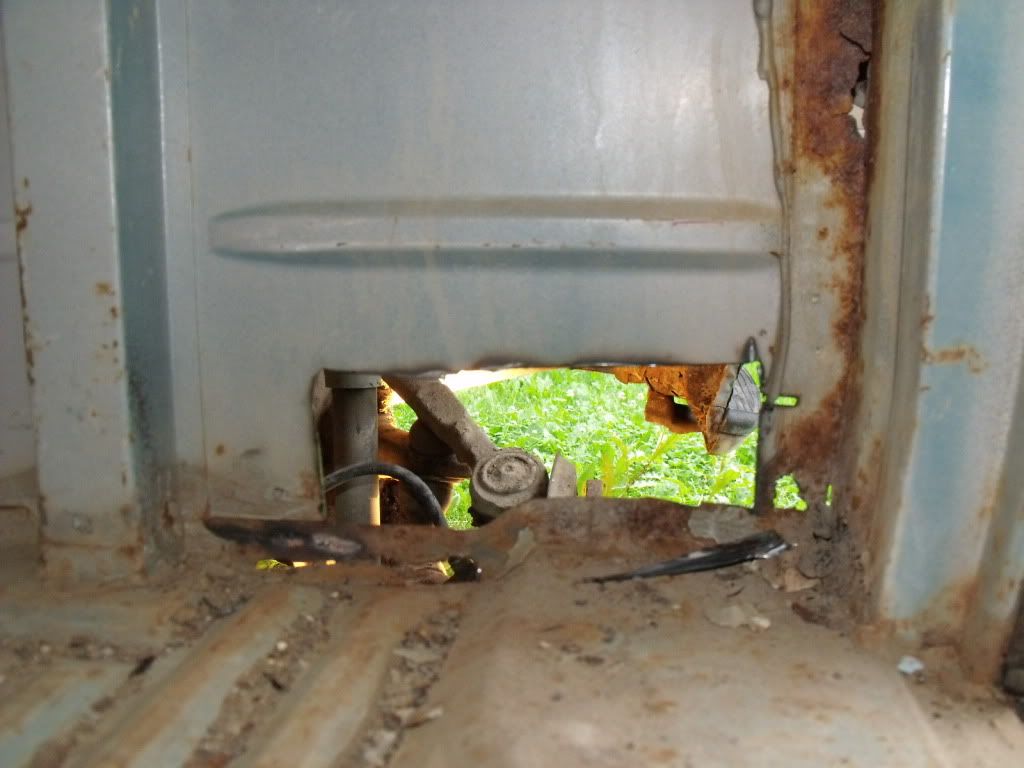 Where the cargo floor meets the rear of the fenderwell panel ( vertical ) there seems to be a small lip that folds upward from the stamped floor section. This is rusted, and my question is...do I try to fabricate that panel...or simply butt-weld the cargo floor to the edge of the fender well panel ( where the big hole is ). 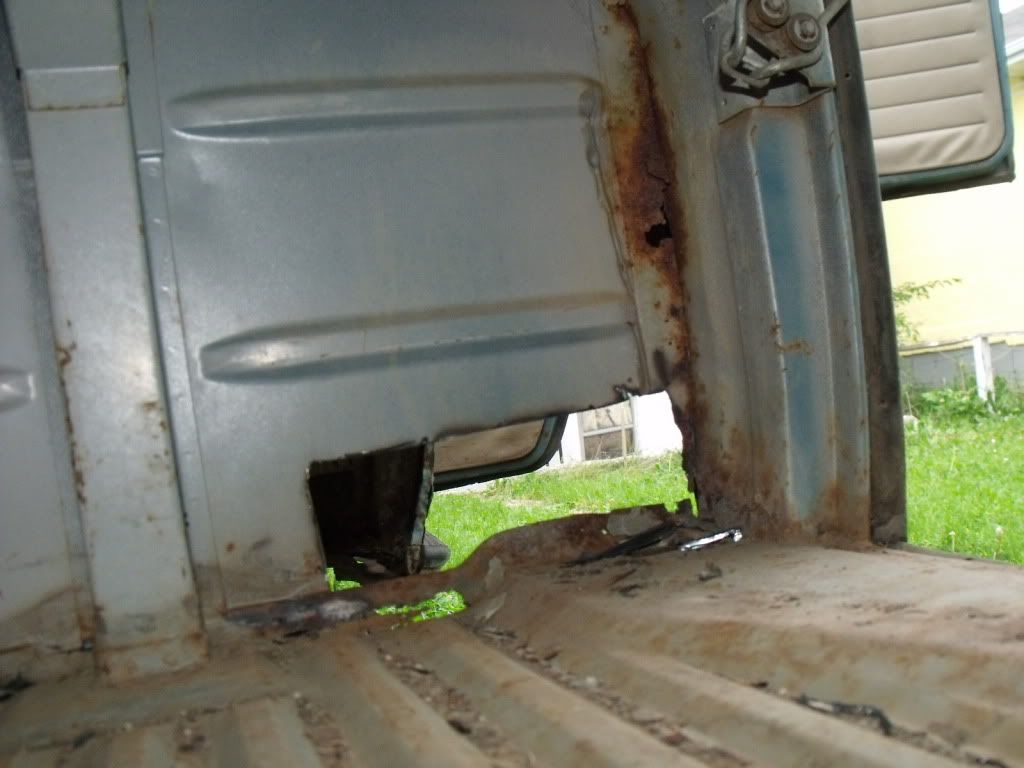 I realize that I need to read more rust repair threads for advice on this...but I also wanted to update you all and let you know that I am working on this...albeit, very slowly. I have found a Parts Bus that is clean and dry...no rust in the dog-legs, fenderwell and likely the same for the jack-points and rockers. I can't see those parts because it's a Sunroof bus...and it still has its belly-pans intact. I just might salvage those too, for duty on the truck. Feel free to give pointers, ask questions and offer advice... Flaming is not necessary, I admit right up front that I'm completely new to cutting, and welding...and I'm going to make some mistakes and poor decisions along the way. But, for me, this is better fixed up and not rusty...than sitting in a scrap yard waiting to be crushed. - Doug |
|
|
|
Post by karmann57 on Jul 17, 2011 17:13:23 GMT -5
I'm afraid I have not much to offer in the way of technical advice, when I did the limited metal replacement on the '68 it was all fairly simple, cut out a flat piece and weld it in. The main goal there was also just to make it water tight, I didn't worry too much about how it was done originally.
I am however intrigued by your parts Bus, is this the Red one that was for sale a few weeks back? I mean absolutely no offense, but if it's really clean and dry is it worth hacking up to fix the single?
I still haven't been out to see Al about his two, in fact he's even managed to pick up another Ghia so I should get out there. I know I've promised before but I'll grab some pictures and send them off to you.
|
|
|
|
Post by bullyboy on Jul 26, 2011 9:07:16 GMT -5
The place where the jack point meets the frame rail is narrow and impossible to
get to with my grinder. I've knocked out the rusty metal with a body working hammer ( the pointy one )...but I don't feel
that it's clean enough to weld to. Advice on how to get into such a tight space? There are flap wheels and scotchbrite products that work in those areas. Have a look on the eastwood site they always have good stuff. |
|


 I was beside myself. So, I RE-READ the owner's manual. It didn't help.
 OMG... do I feel dumb that I returned a unit because it was set up for Aluminum welding right out of the box.